Online Solutions Tips & Tricks.

Showing posts with label Sora Blogging Tips. Show all posts

Monday, October 1, 2018

How To Setup EasyCart Blogger Template

How To Setup EasyCart Blogger Template

EasyCart is an ultimate shopping blogger template, loaded with various kinds of widgets, which helps you to list your product in most effective and stylish way. It looks premium and professional, this is an amazing blogger theme with easy to setup advantage. EasyCart is equipped with various of widgets which will help you to publish your blog more professionally. To make it easy for you we have published this detailed documentation, so that you can setup your blog correctly. You have made a good decision by choosing our template.
You can check the live demo or download the template through the button below and also Please Read this documentation carefully in order to set up your blog and please note that there�s no support for free users.

Basic Setup

  1. Template Installation
  2. Logo Setup
  3. Template Setting
  4. Shortcodes & Markups
  5. Create Sitemap

Video Documentation

You can check this below video to understand the setup process much more easily, just click the below image to watch the video directly on YouTube, or click this link - How To Setup Easy Cart Blogger Template - SoraTemplates


    Header Right Menu

    Access your blog Layout > click Edit icon on Header Right Menu widget.


    Main Menu/DropDown/Multi DropDown/Mega Menu

    Access your blog Layout > click Edit icon on Main Menu widget.


    Normal Link : Features

    Sub Link: _Sub Link 1.0 (before the link add "_") 1 underscore

    Sub Link 2: __Sub Link 1.1 (before the link add "__") 2 underscore

    Mega Shortcode by Label: Technology/mega-menu

    Mega Shortcode by Recent: recent/mega-menu

    Mega Shortcode by Random: random/mega-menu


    Hot Offers

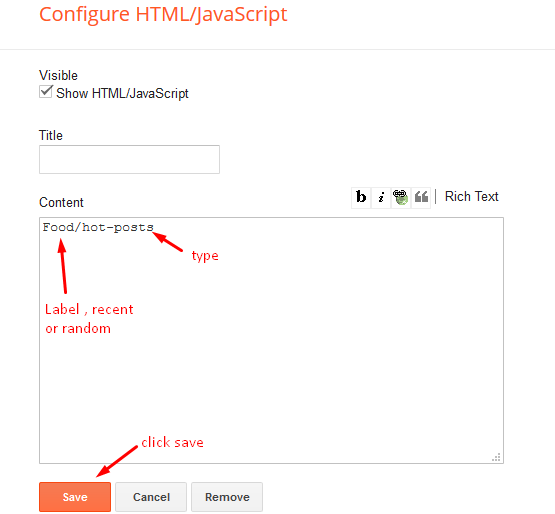
    Access your blog Layout > click Add a Gadget > HTML/JavaScript on Hot Offers section, you must place the following names highlighted in blue below.


    Shortcode: Labelrecent or random/hot-posts


    Example: Food/hot-posts


    Post List Widget

    Access your blog Layout > click Add a Gadget > HTML/JavaScript on Sidebar or Footer section, you must place the following names highlighted in blue below.


    Shortcode: Results number/Labelrecent or random/post-list


    Label Posts: 3/Technology/post-list

    Recent Posts: 3/recent/post-list

    Random Posts: 3/random/post-list


    Social Widget

    Access your blog Layout > click Edit icon on Social Widget widget.


    Icons Avaliables { blogger, facebook, twitter, gplus, rss, youtube, skype, stumbleupon, tumblr, vk, stack-overflow, github, linkedin, dribbble, soundcloud, behance, digg, instagram, pinterest, twitch, delicious, codepen, reddit, whatsapp, snapchat, email }


    Product Page

    Access your blog Layout > click Edit icon on Main Posts/Blog Posts widget.


    Post Layouts

    Left Sidebar: Inside the post add the text left-sidebar and add the style Strikethrough

    Full Width: Inside the post add the text full-width and add the style Strikethrough

    Right Sidebar: Inside the post add the text right-sidebar and add the style Strikethrough


    Product Price and Discount

    Price Shortcode: price/"Your Product Price"
    Discount Shortcode: off/"Your Product Price"

    Price EX: Inside the post add the text price/$59.00 and add the style Strikethrough

    Discount EX: Inside the post add the text off/-35% and add the style Strikethrough


    Cart Page

    Access your blog Pages > click New Page > Title , in title enter "cart" (without quotes).

    Note:- the cart page will not work if you don't put the title correctly, after adding the title your page link must look like this.

    https://ift.tt/2xRiUkx
    or
    https://ift.tt/2DP1URr


    Checkout Page

    Access your blog Pages > click New Page > Title , in title enter "checkout" (without quotes).

    Note:- the checkout page will not work if you don't put the title correctly, after adding the title your page link must look like this.

    https://ift.tt/2xRiLgZ
    or
    https://ift.tt/2DP1Wc1


    Credit Cards Icons

    Access your blog Layout > click Edit icon on Credit Cards widget on Footer.


    Icons Avaliables { paypal, visa, master, amex, diners, discover, jcb }


    Theme Options


    01 - Payment Options

    Access your blog Layout > click Edit icon on Payment Options widget.


    Payment Option: In New Site Name add paymentOption, in New Site URL add your option, after click on save button. default is "PayPal".

    PayPal Email: In New Site Name add paypalMail, in New Site URL add your paypal e-mail, after click on save button.

    Currency Option: In New Site Name add currencyOption, in New Site URL add your currency, after click on save button. default is "USD".

    Available Curencies:

    "USD" - Currency Name ("US Dollar")
    "AUD" - Currency Name ("Australian Dollar")
    "BRL" - Currency Name ("Brazilian Real")
    "CAD" - Currency Name ("Canadian Dollar")
    "CZK" - Currency Name ("Czech Koruna")
    "DKK" - Currency Name ("Danish Krone")
    "EUR" - Currency Name ("Euro")
    "HKD" - Currency Name ("Hong Kong Dollar")
    "HUF" - Currency Name ("Hungarian Forint")
    "ILS" - Currency Name ("Israeli New Sheqel")
    "JPY" - Currency Name ("Japanese Yen")
    "MXN" - Currency Name ("Mexican Peso")
    "NOK" - Currency Name ("Norwegian Krone")
    "NZD" - Currency Name ("New Zealand Dollar")
    "PLN" - Currency Name ("Polish Zloty")
    "GBP" - Currency Name ("Pound Sterling")
    "SGD" - Currency Name ("Singapore Dollar")
    "SEK" - Currency Name ("Swedish Krona")
    "CHF" - Currency Name ("Swiss Franc")
    "THB" - Currency Name ("Thai Baht")
    "BTC" - Currency Name ("Bitcoin")
    "INR" - Currency Name ("Indian Rupee")

    02 - Boxed Version

    Access your blog Layout > click Edit icon on Boxed Version widget.


    In New Site Name add boxedVersion, in New Site URL add true or false, after click on save button.


    03 - Default Variables

     Access your blog Layout > click Edit icon on Default Variables widget.


    Post Per Page: In New Site Name add postPerPage, in New Site URL add the number of results, it should be the same as the posts from the home page, after click on save button.


    Fixed Sidebar: In New Site Name add fixedSidebar, in New Site URL  add true or false, after click on save button.


    Comments System: In New Site Name add commentsSystem, in New Site URL add the comments sytem type {bloggerdisqusfacebook or hide}, after click on save button.


    Disqus Shortname: In New Site Name add disqusShortname, in New Site URL add your disqus comment system shortname, after click on save button.


    Facebook Page Plugin 

    Access your blog Layout > click Add a Gadget > HTML/JavaScript on Sidebar or Footer section, and paste the code below.


    <center><div class="fb-page" data-href="https://ift.tt/2upHtnw" data-width="360" data-small-header="false" data-adapt-container-width="true" data-hide-cover="false"  data-show-facepile="true"></div></center>


    Note: In Attribute data-href replace the link per your facebook page url.


    Customizing Your Template

    Access your blog Theme > click Customize button.


    Here you can change the background, and apply pre-defined colors


    Clicking Advanced You will see the official option to change the Main Colors

    Installation And Custom Services

    We provide plenty of templates for free but if you want something unique for your blog then let us create a unique design for your blog, Just tell us your needs and we will convert your dream design into reality. We also Provide Blogger Template Installation Service. Our Installation service gives you a simple, quick and secure way of getting your template setup without hassle.


    Share:

    Saturday, September 29, 2018

    How To Setup Haster Blogger Template [Way2Themes]

    How To Setup Haster Blogger Template [Way2Themes]


    Haster is a simple yet an attractive blogger template. It has fully responsive design that fits any screensize or device perfectly. Being a simple and clean theme it loads very fast in no time. Haster is equipped with various of widgets which will help you to publish your blog more professionally. To make it easy for you we have published this detailed documentation, so that you can setup your blog correctly.
    You have made a good decision by choosing our template. You can check the live demo or download the template through the button below and also Please Read this documentation carefully in order to set up your blog and please note that there�s no support for free users.

    Basic Setup

    1. Template Installation
    2. Logo Setup
    3. Template Setting
    4. Shortcodes & Markups
    5. Create Sitemap

    Video Documentation

    You can check this below video to understand the setup process much more easily, just click the below image to watch the video directly on YouTube, or click this link - How To Setup Haster Blogger Template - Way2Themes


      Social Menu

      Access your blog Layout > click Edit icon on Social Menu widget.


      Icons Avaliables { facebook, twitter, gplus, rss, youtube, skype, stumbleupon, tumblr, vk, stack-overflow, github, linkedin, dribbble, soundcloud, behance, digg, instagram, pinterest, twitch, delicious, codepen, reddit, whatsapp, snapchat, email }


      Main Menu/DropDown/Multi DropDown

      Access your blog Layout > click Edit icon on Main Menu widget.


      Normal Link : Features

      Sub Link: _Sub Link 1.0 (before the link add "_") 1 underscore

      Sub Link 2: __Sub Link 1.1 (before the link add "__") 2 underscore


      Featured Post

      Access your blog Layout > click Add a Gadget > Featured Post on Featured Post section, select the post you want to show and click save.


      Example:


      Post List Widget

      Access your blog Layout > click Add a Gadget > HTML/JavaScript on Sidebar or Footer section, you must place the following names highlighted in blue below.


      Shortcode: Results number/Labelrecent or random/post-list


      Label Posts: 3/Technology/post-list

      Recent Posts: 3/recent/post-list

      Random Posts: 3/random/post-list


      Social Widget

      Access your blog Layout > click Edit icon on Social Widget widget.


      Icons Avaliables { blogger, facebook, twitter, gplus, rss, youtube, skype, stumbleupon, tumblr, vk, stack-overflow, github, linkedin, dribbble, soundcloud, behance, digg, instagram, pinterest, twitch, delicious, codepen, reddit, whatsapp, snapchat, email }


      Post Layouts

      Left Sidebar: Inside the post add the text left-sidebar and add the style Strikethrough

      Full Width: Inside the post add the text full-width and add the style Strikethrough

      Right Sidebar: Inside the post add the text right-sidebar and add the style Strikethrough


      Theme Options


      01 - Full Width Version

      Access your blog Layout > click Edit icon on Full-Width Version widget.


      In New Site Name add fullWidth, in New Site URL add true or false, after click on save button.


      02 - Default Variables

       Access your blog Layout > click Edit icon on Default Variables widget.


      Post Per Page: In New Site Name add postPerPage, in New Site URL add the number of results, it should be the same as the posts from the home page, after click on save button.


      Fixed Sidebar: In New Site Name add fixedSidebar, in New Site URL  add true or false, after click on save button.


      Comments System: In New Site Name add commentsSystem, in New Site URL add the comments sytem type {bloggerdisqusfacebook or hide}, after click on save button.


      Disqus Shortname: In New Site Name add disqusShortname, in New Site URL add your disqus comment system shortname, after click on save button.


      Facebook Page Plugin 

      Access your blog Layout > click Add a Gadget > HTML/JavaScript on Sidebar or Footer section, and paste the code below.


      <center><div class="fb-page" data-href="https://ift.tt/2upHtnw" data-width="360" data-small-header="false" data-adapt-container-width="true" data-hide-cover="false"  data-show-facepile="true"></div></center>


      Note: In Attribute data-href replace the link per your facebook page url.


      Footer Menu

      Access your blog Layout > click Edit icon on Footer Menu widget.


      Customizing Your Template

      Access your blog Theme > click Customize button.


      Here you can change the background, and apply pre-defined colors


      Clicking Advanced You will see the official option to change the Main Colors

      Installation And Custom Services

      We provide plenty of templates for free but if you want something unique for your blog then let us create a unique design for your blog, Just tell us your needs and we will convert your dream design into reality. We also Provide Blogger Template Installation Service. Our Installation service gives you a simple, quick and secure way of getting your template setup without hassle.


      Share:

      Saturday, September 22, 2018

      How To Setup Fastest Blogger Template [TemplatesYard]

      How To Setup Fastest Blogger Template [TemplatesYard]


      Fastest is a simple and fast loading blogger template it is based on bloggers latest structure, and has various features without compromising the loading speed. Fastest is equipped with various of widgets which will help you to publish your blog more professionally. To make it easy for you we have published this detailed documentation, so that you can setup your blog correctly. You have made a good decision by choosing our template.
      You can check the live demo or download the template through the button below and also Please Read this documentation carefully in order to set up your blog and please note that there�s no support for free users.

      Basic Setup

      1. Template Installation
      2. Logo Setup
      3. Template Setting
      4. Shortcodes & Markups
      5. Create Sitemap

      Video Documentation

      You can check this below video to understand the setup process much more easily, just click the below image to watch the video directly on YouTube, or click this link - How To Setup Fastest Blogger Template - TemplatesYard

      Top Navigation / Footer Menu

      Access your blog Layout > click Edit icon on Top Navigation widget.


      Social Top

      Access your blog Layout > click Edit icon on Social Top widget.


      Icons Avaliables { facebook, twitter, gplus, rss, youtube, skype, stumbleupon, tumblr, vk, stack-overflow, github, linkedin, dribbble, soundcloud, behance, digg, instagram, pinterest, twitch, delicious, codepen, reddit, whatsapp, snapchat, email }


      Mobile Logo

      Access your blog Layout > click Edit icon on Mobile Logo widget.


      Types: imagecustomdefault.


      Main Menu/DropDown/Multi DropDown

      Access your blog Layout > click Edit icon on Main Menu widget.


      Normal Link : Features

      Sub Link: _Multi DropDown (before the link add "_") 1 underscore

      Sub Link 2: __DropDown 1 (before the link add "__") 2 underscore


      Social Widget

      Access your blog Layout > click Edit icon on Social Widget widget.


      Icons Avaliables { facebook, twitter, gplus, rss, youtube, skype, stumbleupon, tumblr, vk, stack-overflow, github, linkedin, dribbble, soundcloud, behance, digg, instagram, pinterest, twitch, delicious, codepen, reddit, whatsapp, snapchat, email }


      Post Layouts

      Left Sidebar: Inside the post add the text left-sidebar and add the style Strikethrough

      Full Width: Inside the post add the text full-width and add the style Strikethrough

      Right Sidebar: Inside the post add the text right-sidebar and add the style Strikethrough


      Theme Options

      01 - Css Options

       Access your blog Layout > click Edit icon on Css Options widget.


      Full Width: In New Site Name add boxedVersion, in New Site URL add true or false, after click on save button.


      02 - Default Variables

       Access your blog Layout > click Edit icon on Default Variables widget.


      Post Per Page: In New Site Name add postPerPage, in New Site URL add the number of results, it should be the same as the posts from the home page, after click on save button.


      Comments System: In New Site Name add commentsSystem, in New Site URL add the comments sytem type {bloggerdisqusfacebook or hide}, after click on save button.


      Disqus Shortname: In New Site Name add disqusShortname, in New Site URL add your disqus comment system shortname, after click on save button.


      Customizing Your Template

      Access your blog Theme > click Customize button.

      Here you can change the background, and apply pre-defined colors


      Clicking Advanced You will see the official option to change the Main Colors

      Installation And Custom Services

      We provide plenty of templates for free but if you want something unique for your blog then let us create a unique design for your blog, Just tell us your needs and we will convert your dream design into reality. We also Provide Blogger Template Installation Service. Our Installation service gives you a simple, quick and secure way of getting your template setup without hassle.

      Only Premium Buyers will get the widget codes available in the demo.
      If you are a premium version user and you are having any problem while setting up the template please contact us by going to this link (Contact Form).


      Share:

      Tuesday, September 18, 2018

      How To Setup Best Result Blogger Template

      How To Setup Best Result Blogger Template


      Folio is an extra ordinary and professionally designed portfolio blogger template, loaded with various kind of features it focuses on creating a personal or any professional one page site on blogger. Folio is equipped with various of widgets which will help you to publish your blog more professionally. To make it easy for you we have published this detailed documentation, so that you can setup your blog correctly. You have made a good decision by choosing our template.
      You can check the live demo or download the template through the button below and also Please Read this documentation carefully in order to set up your blog and please note that there�s no support for free users.

      Basic Setup

      1. Template Installation
      2. Logo Setup
      3. Template Setting
      4. Shortcodes & Markups
      5. Create Sitemap

      Video Documentation

      You can check this below video to understand the setup process much more easily, just click the below image to watch the video directly on YouTube, or click this link - How To Setup Best Result Blogger Template - SoraTemplates


        Main Menu/DropDown/Multi DropDown

        Access your blog Layout > click Edit icon on Main Menu widget.


        Normal Link : Features

        Sub Link: _Multi DropDown (before the link add "_") 1 underscore

        Sub Link 2: __DropDown 1 (before the link add "__") 2 underscore


        Hot Posts

        Access your blog Layout > click Add a Gadget > HTML/JavaScript on Hot Posts section, you must place the following names highlighted in blue below.


        Types: hot-default, hot-colored

        Shortcode: Labelrecent or random/type


        Example: recent/hot-colored


        Featured Posts 01 and 02

        Access your blog Layout > click Add a Gadget > HTML/JavaScript on Featured Posts 01 or Featured Posts 02 section, you must place the following names highlighted in blue below.


        Types: feat-list, col-left, col-right


        Shortcode: Results number/Labelrecent or random/type


        Col Left Ex: 3/Best Courses/col-left


        Col Right Ex: 3/Technology Jobs/col-right


        Feat List Ex: 4/Recommended/feat-list


        Widget Settings Ex:


        Post List Widget

        Access your blog Layout > click Add a Gadget > HTML/JavaScript on Sidebar section, you must place the following names highlighted in blue below.


        Shortcode: Results number/Labelrecent or random/post-list


        Label Posts: 3/Technology/post-list

        Recent Posts: 3/recent/post-list

        Random Posts: 3/random/post-list


        Social Widget

        Access your blog Layout > click Edit icon on Social Widget widget.


        Icons Avaliables { facebook, twitter, gplus, rss, youtube, skype, stumbleupon, tumblr, vk, stack-overflow, github, linkedin, dribbble, soundcloud, behance, digg, instagram, pinterest, twitch, delicious, codepen, reddit, whatsapp, snapchat, email }


        Post Layouts

        Left Sidebar: Inside the post add the text left-sidebar and add the style Strikethrough

        Full Width: Inside the post add the text full-width and add the style Strikethrough

        Right Sidebar: Inside the post add the text right-sidebar and add the style Strikethrough


        Footer Menu

        Access your blog Layout > click Edit icon on Footer Menu widget.


        Widget Example:


        Social Footer

        Access your blog Layout > click Edit icon on Social Footer widget.


        Icons Avaliables { facebook, twitter, gplus, rss, youtube, skype, stumbleupon, tumblr, vk, stack-overflow, github, linkedin, dribbble, soundcloud, behance, digg, instagram, pinterest, twitch, delicious, codepen, reddit, whatsapp, snapchat, email }


        Theme Options

        01 - Full Width

        Access your blog Layout > click Edit icon on Css Options widget.


        Full Width: In New Site Name add fullWidth, in New Site URL add true or false, after click on save button.


        02 - Default Variables

         Access your blog Layout > click Edit icon on Default Variables widget.


        Post Per Page: In New Site Name add postPerPage, in New Site URL add the number of results, it should be the same as the posts from the home page, after click on save button.


        Fixed Sidebar: In New Site Name add fixedSidebar, in New Site URL  add true or false, after click on save button.


        Comments System: In New Site Name add commentsSystem, in New Site URL add the comments sytem type {bloggerdisqusfacebook or hide}, after click on save button.


        Disqus Shortname: In New Site Name add disqusShortname, in New Site URL add your disqus comment system shortname, after click on save button.


        Facebook Page Plugin 

        Access your blog Layout > click Add a Gadget > HTML/JavaScript on Sidebar section, and paste the code below.


        <center><div class="fb-page" data-href="https://ift.tt/2upHtnw" data-width="360" data-small-header="false" data-adapt-container-width="true" data-hide-cover="false" data-show-facepile="true"></div></center>

        Note: In Attribute data-href replace the link per your facebook page url.

        Customizing Your Template

        Access your blog Theme > click Customize button.


        Here you can change the background, and apply pre-defined colors


        Clicking Advanced You will see the official option to change the Main Colors

        Installation And Custom Services

        We provide plenty of templates for free but if you want something unique for your blog then let us create a unique design for your blog, Just tell us your needs and we will convert your dream design into reality. We also Provide Blogger Template Installation Service. Our Installation service gives you a simple, quick and secure way of getting your template setup without hassle.


        Share:

        Labels